17 March 2022

Passos usados para integrar Meraki MX com Zscaler

 Configurações usadas para integrar Meraki MX com Zscaler

1- Identificar que Networks deverão utilizar esta regra

Network tags configuradas em Organization -> Overview, Tag 


2- Configurar non-Meraki VPN peers

Name: (nome que quiserem)
IKE Version: IKEv2
IPsec policies: Custom
        Phase1
            Encryption: AES128
            Authentication: SHA1
            Pseudo-random Function: Defaults to AES
            Diffie-Hellman group: 2
            Lifetime (seconds) : (valor de default)


        Phase2
            Encryption: NULL
            Authentication: MD5
            PFS group: (valor de default)
            Lifetime (seconds) : (valor de default)

Public IP: (ip público do servidor de zscaler)
Local ID: (fqdn que também tem de estar configurado do lado do zscaler. Lista de endereços em: Cloud Enforcement Node Ranges )
Remote ID: (info secundária, nesta situação não foi usada)
Private Subnets: usei 0.0.0.0/0 para permitir todas as redes locais. As redes que passam na VPN são escolhidas em SD-WAN -> Site-to-Site VPN -> VPN Settings
Preshared key: shared key acordada pela equipa que configura a MX e no lado do Zscaler
Availability: network tags configurada no ponto 1


Esta configurações deverão estar "espelhadas" no lado do Zscaler.

Depois de aplicar esta configuração verifica:

Security&SD-WAN -> VPN Status -> non-meraki peer. O status deverá estar "verde"

Ir a Event Log -> "security appliances" -> Event type include: non-meraki/client vpn negotiation e procurar por uma mensagem do género:
msg: <remote-peer-2|xxxx> IKE_SA remote-peer-2[xxxx] established between <mx public ip>[ <fqdn> ]...<zscaler ip>

Para testar, ir a Appliance Status -> Tools -> Ping um endereço público mas com source apontado a uma das redes locais escolhidas para aceder ao zscaler

29 January 2022

ECMS 500-220 - Engineering Cisco Meraki Solutions - my thoughts and suggestions

Passed the Engineering Cisco Meraki Solutions v1.0 (ECMS 500-220).

Start working with Meraki in 2016, did the CMNO in 2018, attended the ECMS2 in 2020, got several Meraki Black belts, the Meraki FIT programs, and the Meraki Guru.
Deployed several projects with Meraki solutions; offices, warehouses, retail stores, hotels, schools.

So I decided to capitalize on all that knowledge and go for the official certification and it went well.


I think it's a fair test, the typical 60 questions/90 minutes multichoice test. It's not easy, but it's not very hard if you have some years of experience working with Meraki. 


As for testing material, I don't know any other vendor that provides so much information and lab environments for free (as long as you are a Meraki partner and have a valid Cisco login).

Here's the list of material that I've consulted:


Manuals and videos

ECMS Exam Self-study Guide

Meraki learning net, especially the deep dive sessions: 

Learning Meraki Net

Meraki Black Belt program:

Black Belt - Engineering - Meraki

Practical labs
Meraki has also a site that suggests the equipment required to build a self-study lab environment

ECMS Self-study Lab Supplement

But even if you don't have access to Meraki equipment, it's possible to run some labs at Cisco's dCloud:

dcloud lab meraki list

(my favorite) Cisco Meraki Launchpad for Partners v1 


For dashboard API, you can check this:

Meraki Developer Hub


Social media
Join the community:

Meraki Community 

subscribe to their youtube channel:

youtube Cisco Meraki Official

and follow them on Twitter:
@meraki

28 January 2021

Cisco LoRA Gateway - Configuração Inicial e Registo de equipamento

Notas e conclusões após testes a uma Cisco LoRA IXM-LPWA-800-16-K9

Tive alguns problemas para me orientar na documentação do equipamento até chegar ao processo necessário para passar um equipamento out-of-the-box até está a comunicar com o servidor em thethingsnetwork.org

Material necessário:


    - Chave de bocas de 12’’ ou chave francesa equivalente ou chave de grifos para aceder á porta de consola e ao botão de reset da gateway.

    - Portátil com cabo de consola.
        Configurar baud rate para 115200.
        Convém que o portátil tenha acesso à Gateway e á Internet para poder interagir com o site thethingsnetwork.org
        Também convém que o portátil tenha a imagem ixm_mdm_i_k9-2.0.32.tar.gz caso seja necessário fazer um upgrade à gateway.

    - Uma rede com acesso à internet e com servidor de DHCP para ligar a gateway e o portátil. Servidor de NTP opcional.

    - Uma conta no site
https://www.thethingsnetwork.org/

    - Dá jeito ter conhecimentos de
vi editor


NOTAS IMPORTANTES SOBRE VERSÕES A UTILIZAR

Cisco Lora Gateway

            Neste processo estamos a considerar que a gateway vem de fábrica a funcionar em modo standalone e com a versão 2.0.32. Mesmo que não seja esse o caso, aconselhamos que seja esta a versão a seguir por causa da versão dos scripts. Á data de elaboração deste documento, a versão mais recente é a 2.1.0 2, no entanto, há algumas situações com essa versão:

            - A versão 2.1.0.2 já não traz a tool pkt_forwarder de fábrica. Se se migrar a gateway sem antes ter feito os scripts de instalação do Packet Forwarder de testes não vai ser possível arrancar o processo de envio de pacotes para o servidor de LoRA, ou seja, o processo falha quando se chega ao ponto de correr o comando /etc/pktfwd/pkt_forwarder -c /etc/pktfwd/config.json -g /dev/ttyS1 

             - Há problemas em a versão 2.1.0.2 arrancar automaticamente o pkt-forwarder no /etc/init.d, ou seja, sempre que a gateway faz um reset, é necessário entrar na Shell e arrancar o packet forwarder manualmente. Na versão 2.0.32 isso já não acontece.

Configuração Inicial e Registo de Gateway

Este documento é baseado neste processo: https://www.thethingsnetwork.org/docs/gateways/cisco/setup.html


As maiores diferenças é que nesse documento a transferência em feita via usb e neste documento as transferências são feitas via tftp


Ligar a gateway á energia, ligar o cabo de consola (não esquecer do boud rate a 115200).

O interface de ethernet da gateway vem configurado de fábrica para ganhar endereço por DHCP. Verificar o endereço que a gateway ganhou através do comando show ip interface

Testar o acesso à internet com o comando ping ip 8.8.8.8

Verificar a versão de lora gateway aplicando o comando show version. Caso seja necessário fazer um upgrade, seguir o processo do site ou caso seja necessário fazer por tftp aplicar o comando

#archive download-sw firmware /normal /save-reload tftp://<ip do tftp>/ixm_mdm_i_k9-2.0.32.tar.gz


Verificar o data e hora na gateway. Configurar o NTP server ou configurar a data e hora manualmente com o comando clock set <hh:mm:ss> <month> <day> <year>


Arrancar o GPS

Arrancar o Radio

Configurar a password de enable

Seguir os passos de Verifications: https://www.thethingsnetwork.org/docs/gateways/cisco/setup.html#verifications


Passar á Shell do equipamento request shell container-console e aplicar os comandos do site:

https://www.thethingsnetwork.org/docs/gateways/cisco/setup.html#installing-the-packet-forwarder


Nota sobre o comando cp /tools/pkt_forwarder /etc/pktfwd/pkt_forwarder . Este comando funciona na versão 2.1.0.2 porque este já não vem incluido na /tools

Copiar um template de teste:
cp /tools/templates/config_loc_dual_antenna_8ch_full_diversity_EU868.json /etc/pktfwd/config.json

exemplo de configuração em gateway com MAC address AABBCCDDEEFF

    "gateway_conf": {

        "gateway_ID": "AABBCCFFFEDDEEFF",

        /* change with default server address/ports */

        "server_address": "router.eu.thethings.network",

        "serv_port_up": 1700,

        "serv_port_down": 1700,

        /* adjust the following parameters for your network */

        "keepalive_interval": 10,


Fazer o comando more /etc/pktfwd/config.json para confirmar que as alterações estão de acordo com o pretendido.


Sair do modo shell ( comando exit seguido de ctrl+a seguido de q)


Para registar gateway em thethingsnetwork.org seguir os passos https://www.thethingsnetwork.org/docs/gateways/cisco/setup.html#gateway-registration


https://console.thethingsnetwork.org/gateways

Depois do registo, copiar a Gateway Key para o clipboard

Na máquina local, criar o ficheiro com a Gateway Key, por exemplo, lrr-local1.pubkey com a Gateway Key que gerada no site.

Aceder novamente á consola da gateway

Transferir a key para a gateway via usb ou tftp ( copy tftp://<ip tftp>/lrr-local1.pubkey flash: )

Instalar a pubkey

(config)#packet-forwarder install pubkey flash:lrr-local1.pubkey

Installed successfully


Voltar a aceder via shell


Correr o script /etc/pktfwd/pkt_forwarder -c /etc/pktfwd/config.json -g /dev/ttyS1


Instalar o Packet Forwarder
https://www.thethingsnetwork.org/docs/gateways/cisco/setup.html#installing-the-packet-forwarder-1


Confirmar que o script está correto fazendo more /etc/init.d/S60pkt_forwarder

Sair da Shell
Gravar a configuração fazendo copy running-config start-config


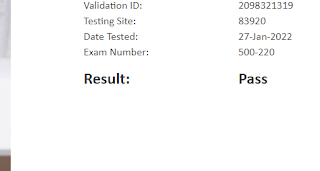
Nesta fase, a gateway já deverá estar a comunicar com o servidor:


Documentos úteis:

 https://www.cisco.com/c/en/us/td/docs/routers/interface-module-lorawan/software/configuration/guide/b_lora_scg/lrr.html

https://content.cisco.com/chapter.sjs?uri=/searchable/chapter/content/en/us/td/docs/routers/interface-module-lorawan/software/configuration/guide/b_lora_scg/lrr.html.xml

https://www.cisco.com/c/en/us/td/docs/routers/interface-module-lorawan/hardware/installation/guide/b_lora_hig/b_install.html#con_1178305

https://content.cisco.com/chapter.sjs?uri=/searchable/chapter/content/en/us/td/docs/routers/interface-module-lorawan/software/configuration/guide/b_lora_scg/lrr.html.xml

https://www.thethingsindustries.com/docs/gateways/ciscowirelessgateway/

https://www.cisco.com/c/en/us/support/routers/interface-module-lorawan/series.html

https://www.ciscolive.com/c/dam/r/ciscolive/emea/docs/2019/pdf/BRKIOT-1291.pdf

https://www.ciscolive.com/c/dam/r/ciscolive/emea/docs/2018/pdf/BRKIOT-1291.pdf (slide 36)

02 December 2020

Podcast "Wificando" - vamos falar sobre wireless

Apesar de 2020 estar a ser um ano atípico, com todas estas condicionantes que se sabem, também tem sido um ano cheio de trabalho. De tal maneira que tem sido muito complicado arranjar tempo para conjugar vida profissional, vida familiar, desenvolvimento pessoal, e ainda introduzir temas no blog, apesar de ter meia dúzia de posts que vão a meio e prestes a serem publicados.

No entanto, eu e um colega da irmandade de profissionais de wireless decidimos avançar com um podcast falado em português sobre tecnologias wireless. 

São conversas descontraídas sobre soluções de fabricantes, boas práticas, experiências e as nossas opiniões sobre certificações técnicas que já tirámos ou quais os nossos próximos objectivos.

Basicamente estamos a registar e a publicar as conversas que costumamos ter à hora de almoço.

Se quiserem nos ouvir, o podcast é WIFICANDO e está disponível no spotify, youtube e apple podcasts.

Wificando no Youtube

Já gravámos 9 episódios e temos tido bom feedback.


12 July 2020

Meraki ECMS2 - My personnal view on the course

Made recently the Meraki's ECMS2 course:

https://community.meraki.com/t5/ECMS2/ct-p/ecms2


The course took three days which covered almost every feature of Meraki solutions.

First day we were presented with planning requirements, designing methods and an overall, close to reality, view of networking.

Second day, was more technical and hands-on. We were presented with Building VPN, WAN topologies, Security features, Switching, Wireless and Endpoint management.

Third day, we worked with cameras, insight and network automation. Ending the day with a troubleshooting lab.

As usual in Meraki events, the instructors were top notch. Rafa and Guido are truly Meraki evangelists. Very knowledgeable in all Meraki portfolio and very eager to interact with students.

And as always in Meraki events, there is so much information in such limited time that the coffee and lunch breaks are usually shorter that all other technical events.

My only negative remark was the troubleshooting lab. I think it should have been longer and similar to the one I did in the CMNO exam. In ECMS2 were are given with the problems and the solutions are in the manuals. In CMNO, after we ended the lab configurations, we were told to wait for a few minutes, long enough for the "little goblins due their mischievousness" on our pristine lab pod, and then we were told to solve all problems.
It would have been great for a extra day just for troubleshooting all topics that were presented without a script and solution guide.

Now it's just waiting for ECMS2 exam to be release on Pearson Vue and schedule the exam.

02 May 2020

Some free online training and certifications programs

At the end of these programs don't expect to be able to deploy a equipment from scratch but I think they are a good solution either as an introduction to technologies and solutions that you are not very familiar, or to keep up with the latest updates or even to dust off something you have already studied.

Most of them you just need to be a registered user, or your company is a registered partner.

Cisco Black Belt
Cool intro for some technologies. A lot of study material are presentations from CiscoLive.


link: SalesConnect for Partners


Meraki FIT
I confess that I have a soft spot for Meraki since 2015. I love how they keep developing their solutions and keeping to be such a user friendly system. Reached Meraki Fit Level 2 in a flash.

link: Meraki FIT

Cisco Platinum Library
Massive technical library. 1097 topics, ranging from webinars to e-courses. More techical than the BlackBelt program


link: Cisco Platinum Library

Nokia Learning & Development Hub
Not all the training it's free but there are a few gems in there.

link: Nokia Learning Portal

Ekahau University
Loads of totally free info.

link: Ekahau University


CWNP CWS
It's CWNP training and it's free; do I need to explain more?! The training is free but you will have to pay the exam.

CWS - Certified Wireless Specialist
go to cwnp.link/cwsel and enter the code CWS2020.


As we say in Portugal: "O saber não toma lugar"

23 February 2020

Ekahau Survey and Analyzer for iphone - Ekahow indeed

I realized that I've been using Ekahau tools for more than ten years. Used since version 2.2 and yet I'm still amazed with their inovative solutions.

Their latests solutions; Ekahau Survey and Ekahau Analyzer, both for iphone are both a dream come true to everyone that have walked dozens of kilometers, carring a 2kg laptop.


I'm sure this picture brought back a lot of painfull memories...


Already used to survey a customer facility and it's amazing the speed of a walked-in site survey. I love the WLANPros survey tray but the overall agility of that surveying with an smartphone takes the experience to a new level.

Ekahau Analyzer showing two APs (ch1 and ch11 in the 2,4Ghz; ch52 and ch60 in the 5Ghz) and bluetooth traffic in 2,4Ghz.


Ekahau Analyzer showing an AP (ch1 in 2,4Ghz) and a microwave oven.


To connect the iphone to the sidekick you need either a micro-sd to lightning cable (which is hard to find) or a apple adaptor MK0W2ZM/A; I prefer the adaptor because it allows to charge the iphone without disconnecting from the sidekick.


31 December 2019

2019 - Looking back to one of the most challenging years of my life.

This year passed so fast...

Such a roller coaster of emotions, in every aspect of my life.

Moving into a new house, kids changing schools, new routines, being accepted in the Cisco Champions program, a great CLEUR19, getting back and work in some very interesting projects to later found myself in a company passing through a severe crisis, passing CCIE-W written (again), having a training plan for the CCIE-W lab approved and cancelled (again), moving to another company, new colleagues, new routines, so many exciting projects and challenges, having a training plan for the CCIE-W lab approved and cancelled (again; this time due to time limitations before the new lab version), a phenomenal WLPC_EU19, new technologies, new tech solutions, new challenging projects, new certification paths, getting the an email from CWNP stating that I've reached the required credits to renew my CWNE...

But all that would be meaningless if I left out the really important; my family. Playing with my kids, watching a episode of Sponge Bob Square pants and laughing out loud, helping them with their home work, with their doubts, their thoughts, their fears.


It ended with a sad note, when my last living grandmother, the matriarch of our family, left us three days before Christmas. But, looking into her life story, which deserves a blog post, made me realized that some of the decisions that I made came from the example of my parents and grandparents. Each with strong work ethics but never forgetting their loved ones and always trying to do what was best for them.

And speaking of loved ones, I would like to thank my wife for everything. A working mom that juggles a career and a family life, but still looking way younger than her actual age. I'm so lucky to have you on my life.

The future looks very bright!

One of my few regrets is that I would like to write more in blog, but then again, I also like to sleep at least 5 hours per night.

11 October 2019

WLPC Prague 2019 - "You should never meet your heroes"


Actually, you should meet your heroes, just choose them wisely.

wlpc-prague-2019 was my third WLPC-Europe. It was so nice to review so many familiar faces and to finally meet so many people which work I've been following for some time. Of course, it was also great to make so many new friends, and talk not only about wifi but also to share ideas, experiences and the pains of being a wifi network engineer.

Every WLPC has been a humbling and very enriching experience. So many knowledge gather in one place, so many heartwarming interactions and such great camaraderie. 

The sessions were great but Gjermund knocked everybody’s socks off with his airtime calculator.
Visualization of Airtime | Gjermund Raaen | WLPC Prague 2019


A last-minute session, with the conclusions of the “Wifi 6 party”, compiled and presented by  Dennis Klein (@SynicWiFi was fantastic. The technology is still a bit green, but has a bright future and it will definitely surpass the market value of 802.11ac. Here’s a brief moment where we can witness OFDMA in action (1 AP and 4 wifi6 clients):


Bootcamp – ECSE-Advanced
I highly recommend the ECSE-Advanced bootcamp or any other wlpc bootcamps. The amount of knowledge and experience greatly surpass the value of the registration. I’ve been in some presentation regarding the bootcamp subject and thinking “hmm, I need to test that in my lab…” but when I got back to the office or my home lab, life happened and it’s really hard to find the balance of family, work and study.
So it was great to finally have the time and the mentoring to follow those subjects and witness their advantages. Also, having a trainer like Blake Krone and François Verges as my lab partner and mentor, it was just perfect.


API Deep Dive
When I was selecting the deep dive sessions, I could have gone for sessions that I’m more comfortable like Eddie’s Wireshark or Joel’s soldering&arduino, but I do believe that sometimes you have to leave your comfort zone and take chances, so I choose the one that I have heard about it but I was also the one that I had the least experience. But, when I got an email from Mike Albano, with the documentation and the preparation steps that we must have concluded before the session, my initial thought was, “Oh God! What have I done?”
I didn’t understand most of the exercises in the document. Never installed dockers, never used github, practically no experience with python… oh boy… well, what’s done is done so let’s see how it goes.
The fact is that after a few hours of training I was configuring my first AP with API and also had my open source TSDB. Just another example of how great the cwnp/wlpc instructors are and how well the sessions are prepared.

15 September 2019

Tricks & Tips - installing in racks - preinstallation stage

Summary: Tricks and tips that I learnt during my career.
A set of rules that I follow before my installations that I found myself repeating to junior colleagues. 

1- Check the installation space 
Apart of the obvious "check if there is enough space for the equipment", make sure have the required U(s) and install the equipment in the right U(s). Believe me, in this job, there are few things more frustrating than going for an installation and you need to rearrange some equipment's because someone didn't install theirs correctly. 

Nowadays, most of the racks have the Us numbered, so before the installation, confirm witch U(s) are you going to use:


 (If you don't know what a U is, please check the link below "A typical section of 19-inch (482.6 mm) rack rail" : Rack_rail_dimensions )

2- Confirm the power outlets

 I'm from Portugal so we mostly use CEE outlets but you might found racks with C13 or C20 power outlets so check out if the equipment came we the right cable. Here's a nice article that sums it all nicely:  

FS.com community: "How Much Do You Know about Power Cord Types?" 
 

This is something that most non-tech people overlook so I strongly suggest that you confirm it personally.


3- Confirm if there are cage nuts for the equipment

Here's something that's vastly overlook by non-tech people. Confirm if the equipment has  cage nuts or if their are included in the list of equipment.
Use a cage nut tool to install them but since it's most likely you don't have such tool, have a least a "flat-blade" screwdriver at hand.


4- Check the cabling and the SFPs

Here's something that shows if the non-tech people involved on the project has any experience. Usually, the most experience accounts or pre-sales team or project managers are aware of the quantities and different types of SFPs and also the cabling that is required, but I urge you to confirm if the order has the right amount of cabling or if the customer will provide some or all of it.
Also, make sure that the cabling has the right length and the proper termination, specially the FO pairs. Nowadays, the vast majority of FO terminations are LC-LC but you should be aware that there are other kinds of FO terminations (SC or ST).
  
5- Stage your equipment
Staging is was separates the pros from the newbies.
You never know what would be the conditions on site at the day of the installation so everything that can be prepared prior is a must. I usually say to my junior colleagues to stage the equipments in such way that when they go on site, they only need to mount, cable and power it because:

  • You don't know if there won't be any power issues during the installation.
    Sometimes customers schedule different teams to work during their maintenance window and you might end up waiting for the power to come up. However, if your equipment was staged properly, you know that you can mounted it and just need to plug the power cables after they finish their work. Also, make sure you can mount your equipment without having to connect a laptop to check the config or status. For instance, if you are mounting a switch stack, you should know (for instance; write some note at the equipment box) which switch is the master switch and preferably, the switches are mounted according to the order of the stack. Sure you can renumber it after but it's not efficient work.


  • You don't know what will be physical the conditions on site.
    It's a lot better to be seated in a comfy chair, in a room with proper light and AC while you install the blank covers, the mounting brackets, the stack modules, the fans and network modules instead of crouching over the equipment, with AC blasting over (or below) you, under poor light or at a very noisy environment.
  • You don't know if you will have a place to lay your laptop and configure the equipment.
    It's a lot better to calmly configure a equipment while you are seated on a comfy chair, in a room with AC, with time to check manuals or clarify configuration details instead off standing in an extremely cold (or hot if there isn't any AC yet) tech room, while holding a laptop with one arm and punching commands with the other hand and there's someone using a power drill in a room near by.


  • You don't know if you have a DOA (dead-on-arrival) equipment or a faulty cable.
    Which it's not the installers fault but all in all, it's the installer who stands in front of the customer. No matter what he says the thought that will linger in the mind of the customer will be "well, if you have tested the equipment before this wouldn't end up being a waste of time for all of us..."
  • You don't know what is the firmware it's on and if an upgrade is required.
    It's a lot better to calmly download the proper version while you are seated on a comfy chair with a stable internet connection than being on site, looking for place to activate your personal hotspot and download through a mobile connection a image that can be several hundreds of megabytes in size.


Here's a story I also like to tell my junior colleagues and that it sums this all. When you schedule a cable service for your house, what do you expect from the cable technicians?
That they should arrive on time, extend the cable/fibber to your house, plug and power up everything, call central to activate the service, test everything and it's all done. You can go on with your lives. But I'm sure you will file a complain if you heard anything like "Oh, sorry, we need to postpone the installation because..."
"... I don't have the right power cable."
"... I don't have the right tools."
"... the equipment it's dead."
"... it's the first time I see this equipment and I don't know how to configure it"


Next time, I will blog about tricks and tips that I use during my installations.

How about you? Any more tricks and tips that you would like to share? Please write them on the comments below. Thank you.

Passos usados para integrar Meraki MX com Zscaler

  Configurações usadas para integrar Meraki MX com Zscaler 1- Identificar que Networks deverão utilizar esta regra Network tags configuradas...